

.png)
.webp)
Social commerce is becoming popular and the use of chatbots is making it easy for customers to interact with businesses. With the ever-increasing trend focusing on effective customer support, there is no doubt that a chatbot solution simulating Swiggy is seen as a necessity currently. Connected, is a potent workflow automation tool that contains all the features needed to develop an agent that can effectively emulate Swiggy’s celebrated conversational bot.
In this detailed tutorial, we will learn how to create a Swiggy-like chatbot using the Nected app, the step-by-step approach, and the visual workflow editor. At the end of this stream, using Nected you will understand how to create a conversational flow, how to connect it with an external system how to implement interactive elements, and how to include the chatbot in your main application. Whether you have prior experience in developing or it is your first time designing a chatbot, this guide will ensure that you acquire adequate knowledge and skills to design a functional and interactive Swiggy-like chatbot that can help take your company to the next level in satisfying your valued customers.
Set up your Nected account and create a new workflow
To begin creating a Swiggy-like chatbot using Nected, you need to set up your Nected account and create a new workflow. This section will guide you through the necessary steps to get started.
Step 1: Sign Up for a Nected Account
- Visit the Nected Website: Go to the Nected website () and click on the "Sign Up" button.
- Fill in the Registration Form: Enter your details, including your name, email address, and password. Ensure that the email address is valid as you will receive a confirmation email.
- Verify Your Email: Check your email for the confirmation email from Nected. Click on the link provided to verify your email address.
- Log In to Your Account: After verification, log in to your Nected account using your email and password.
Step 2: Create a New Workflow
- Access the Nected Dashboard: Once logged in, you will be directed to the Nected dashboard.
- Navigate to the Workflow Option: On the left-hand panel of the dashboard, click on the "Workflows" option. This will take you to the section where you can view, create, and manage all your workflows.
- Create a New Workflow:
- Click on the "Create Workflow" button.
- Name your workflow (e.g., “Sample Workflow”) and decide its stage (staging or production). Staging allows you to test the workflow without affecting live data, while production puts the workflow into actual use. By default, it is always in staging.
- Click on the "Create" button to create the new workflow.
Step 3: Define the Workflow Details
- Define Workflow Settings: After creating the workflow, you will be taken to the workflow settings page.
- Set Workflow Description: Provide a brief description of your workflow to help you and others understand its purpose.
- Set Workflow Tags: Add relevant tags to your workflow to help categorize and filter it later.
Step 4: Configure the Workflow Nodes
- Add Trigger Nodes: Triggers initiate the workflow based on specific conditions. Click on the "Add Trigger" button and select the type of trigger you want to use (e.g., API Trigger).
- Define Trigger Parameters: Define the parameters for the trigger, such as document type, source ID, or any other criteria relevant to your workflow.
- Add Action Nodes: Next, specify the actions that should occur once the workflow is triggered. Click on the plus icon to add actions.
- Configure Action Details: Define the details of each action, including the type of action and any necessary parameters.
Step 5: Test the Workflow
- Test Each Step: Before deploying the workflow, it’s crucial to test each step to ensure that all components work as expected and that the workflow logic is sound.
- Run Tests: Test the API trigger to check if it activates correctly and if all subsequent actions are performed accurately.
Step 6: Publish the Workflow
Once testing is complete and you are satisfied with the workflow's performance, publish it. This makes the workflow live, enabling it to handle real-time data and processes.
By following these steps, you can effectively set up your Nected account and create a new workflow, laying the foundation for building a sophisticated chatbot that can replicate the success of Swiggy's renowned conversational assistant.
Define the chatbot's conversational flow
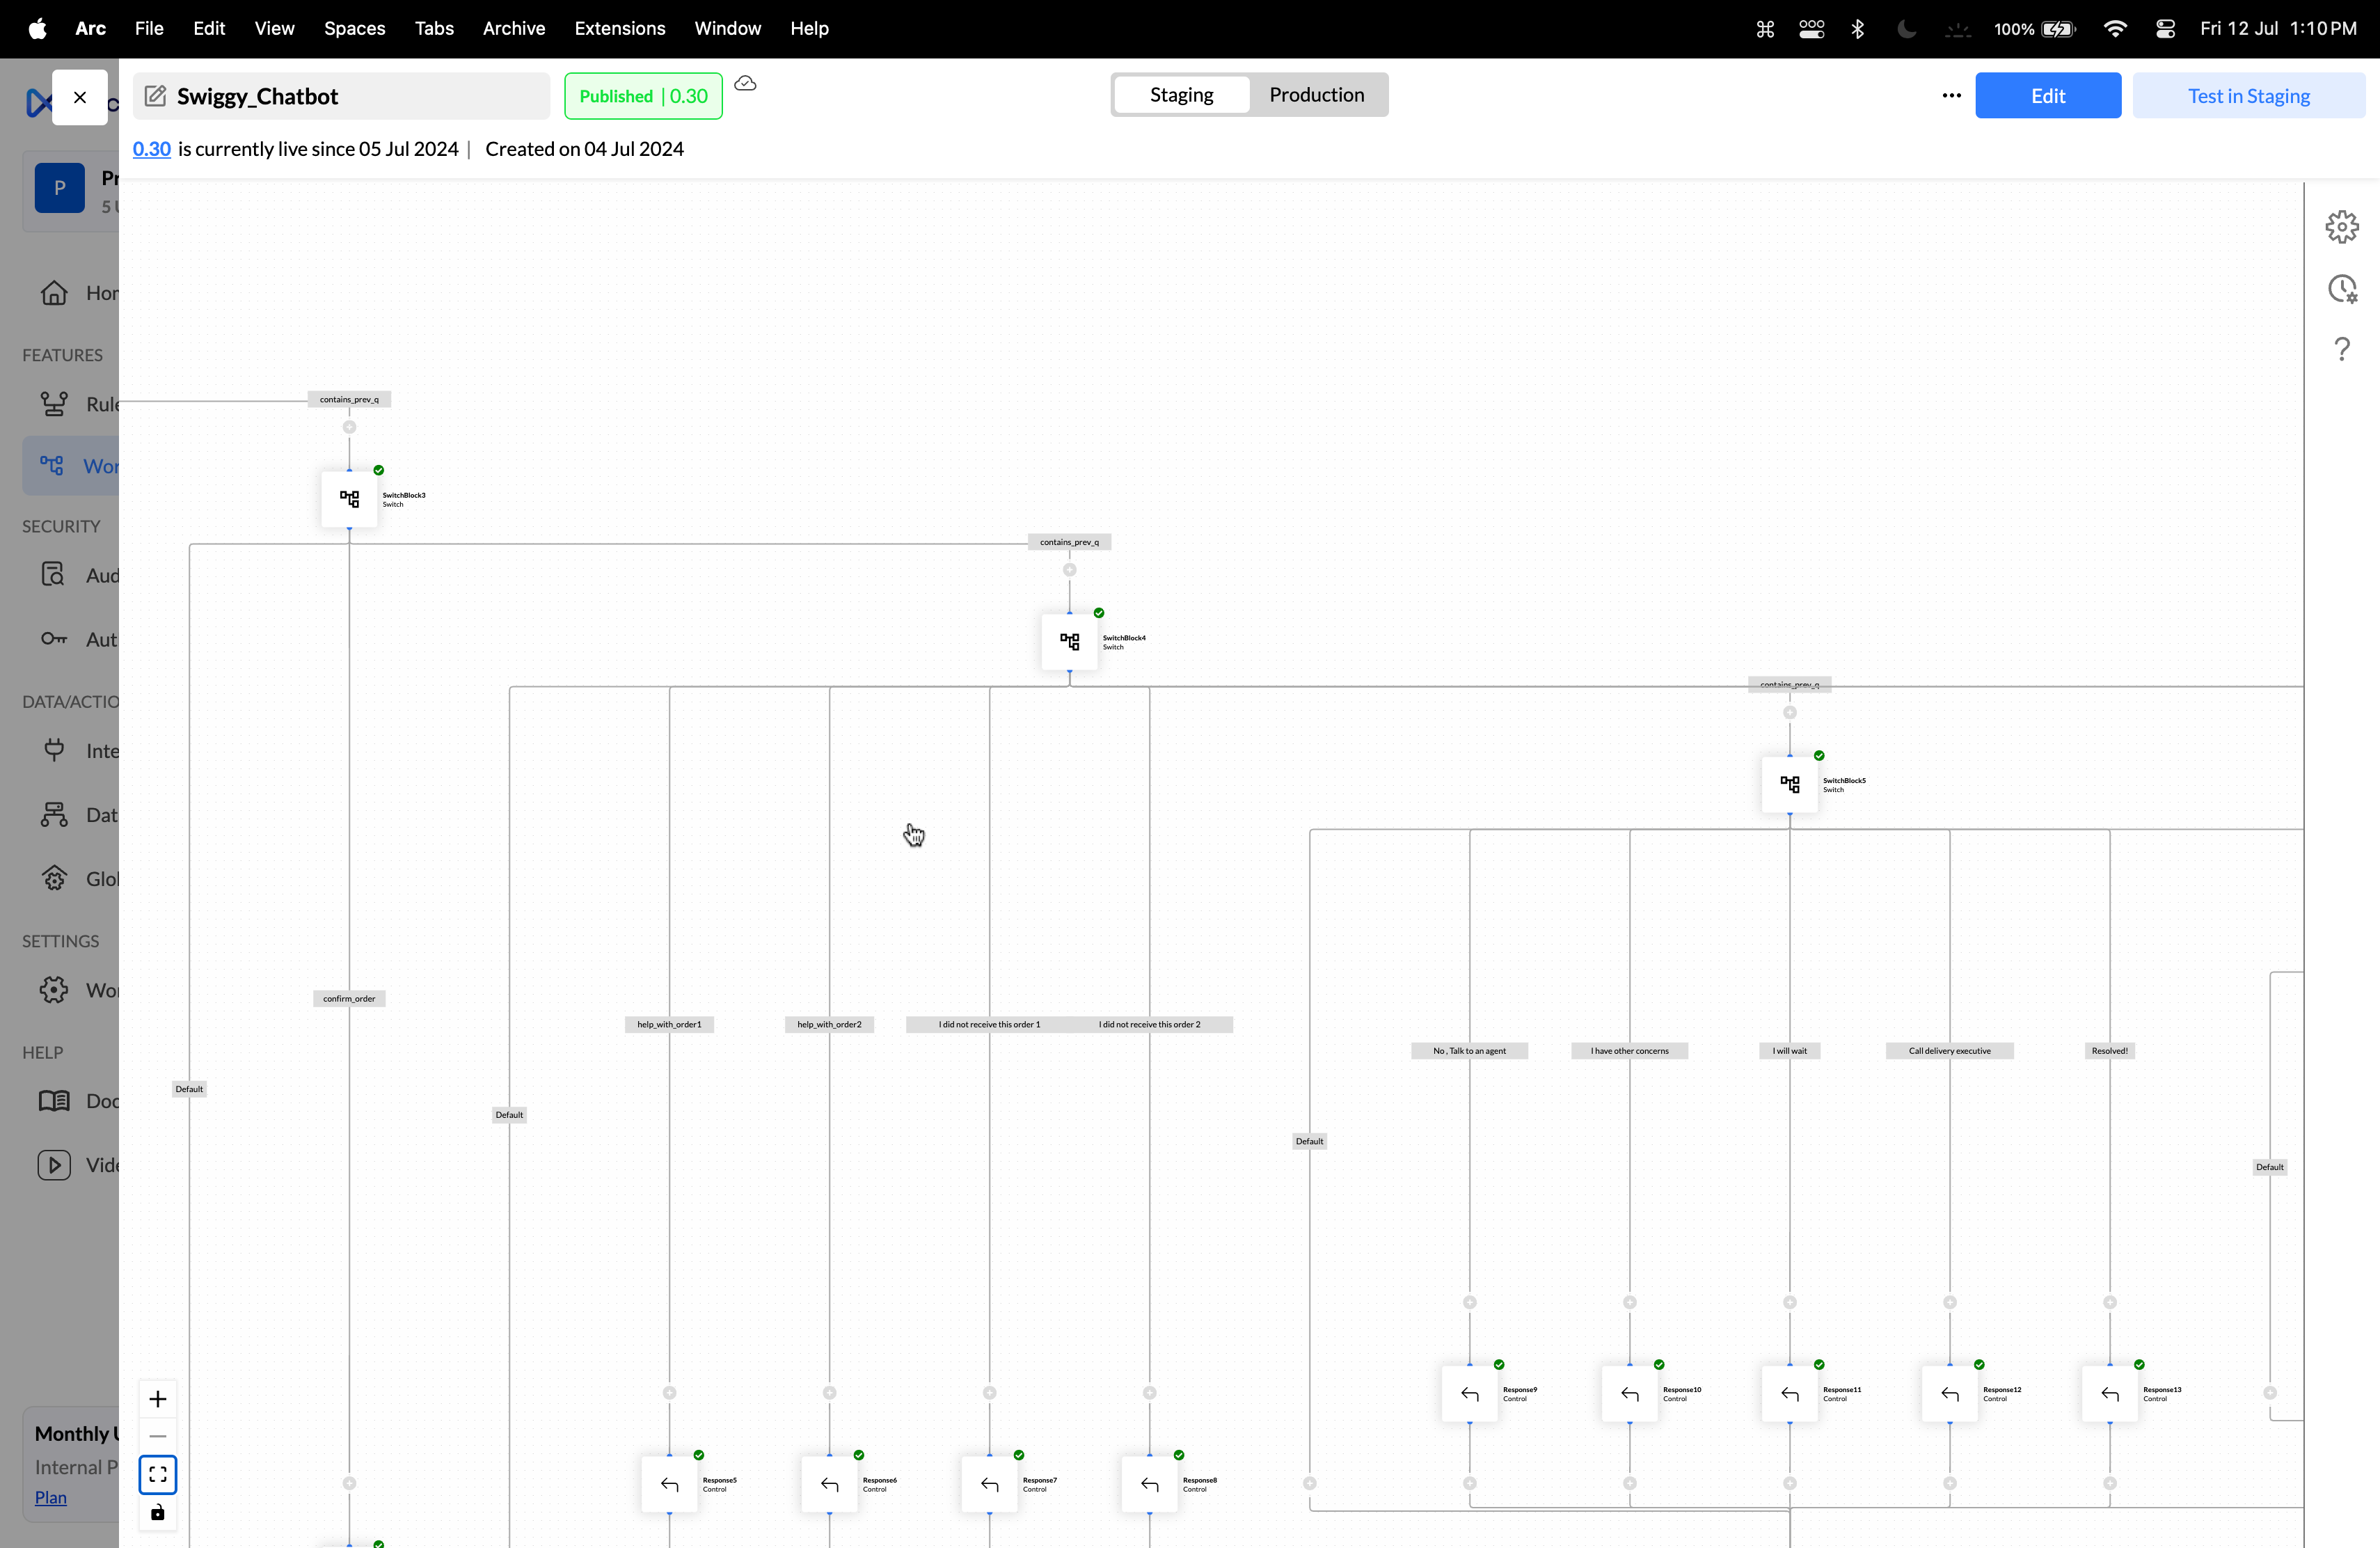
After setting up your Nected account and creating a new workflow, the next step is to define the chatbot's conversational flow. This involves designing the decision tree-like structure that will guide the chatbot's responses based on user inputs. Nected's powerful workflow editor, particularly the Switch Block and Response Node, will be instrumental in crafting an engaging and efficient conversational experience.
Step 1: Identify User Intents
Begin by identifying the various intents or user queries that your chatbot should be able to handle. These could include order status inquiries, menu information, delivery updates, and more. Clearly defining these intents will help you structure the conversational flow accordingly.
Step 2: Create Nodes for User Intents
In your Nected workflow, add nodes for each of the user intents you've identified. These nodes will serve as the decision points in your chatbot's conversational flow.
Step 3: Implement the Switch Block
Nected's Switch Block is a crucial control node that allows you to define multiple execution paths based on specific conditions. Use the Switch Block to create branching logic that will direct the conversation based on the user's input.
- Add a Switch Block Node: From the "Add Node" panel in your Nected workflow, select the "Switch Block" node and place it on the canvas.
- Configure the Switch Conditions: Double-click the Switch Block node to open its configuration. Here, you can define the conditions that will determine the conversation path.
- For each user intent, create a case statement that checks for the corresponding input or trigger.
- Specify the appropriate response or action that should be taken for each case.
- Connect the Conversation Paths: Link the Switch Block node to the corresponding Response Nodes or other action nodes based on the defined cases. This will create the branching structure of your chatbot's conversational flow.
Step 4: Utilize the Response Node
The Response Node is a crucial component in Nected's workflow design, as it facilitates seamless communication between the workflow and the chatbot's responses.
- Add Response Nodes: For each user intent, create a Response Node that will generate the appropriate chatbot response.
- Customize the Response Content: Double-click the Response Node to configure its content. Here, you can define the text, images, or other multimedia elements that will be displayed to the user.
- Integrate External Data: If necessary, you can fetch data from external systems (e.g., order management, product catalog) and dynamically incorporate it into the chatbot's responses.
Step 5: Test and Refine the Conversational Flow
Thoroughly test your chatbot's conversational flow to ensure that it handles various user inputs correctly and provides relevant and helpful responses.
- Simulate User Interactions: Use Nected's testing capabilities to simulate different user scenarios and verify that the chatbot's responses are appropriate and aligned with the defined intents.
- Identify and Address Gaps: Analyze the test results and identify any gaps or areas for improvement in the conversational flow. Refine the Switch Block conditions, Response Node content, and external data integrations as needed.
- Iterate and Optimize: Continuously monitor the chatbot's performance, gather user feedback, and make iterative improvements to the conversational flow to enhance the overall user experience.
By following these steps and leveraging Nected's powerful workflow tools, you can create a sophisticated and engaging chatbot that replicates the success of Swiggy's renowned conversational assistant. The combination of the Switch Block and Response Node will enable you to design a dynamic and responsive conversational flow that can adapt to various user scenarios and provide personalized, data-driven responses.
Integrate the API within your code
To integrate the Swiggy-like chatbot functionality into your application, you will need to leverage Nected's workflow API capabilities. This section will guide you through the process of triggering the workflow via the API and then integrating it within your JavaScript code.
Step 1: Trigger the Workflow via API
Nected allows you to securely trigger a workflow from your systems via an API. This enables you to initiate the chatbot's conversational flow based on user interactions within your application.
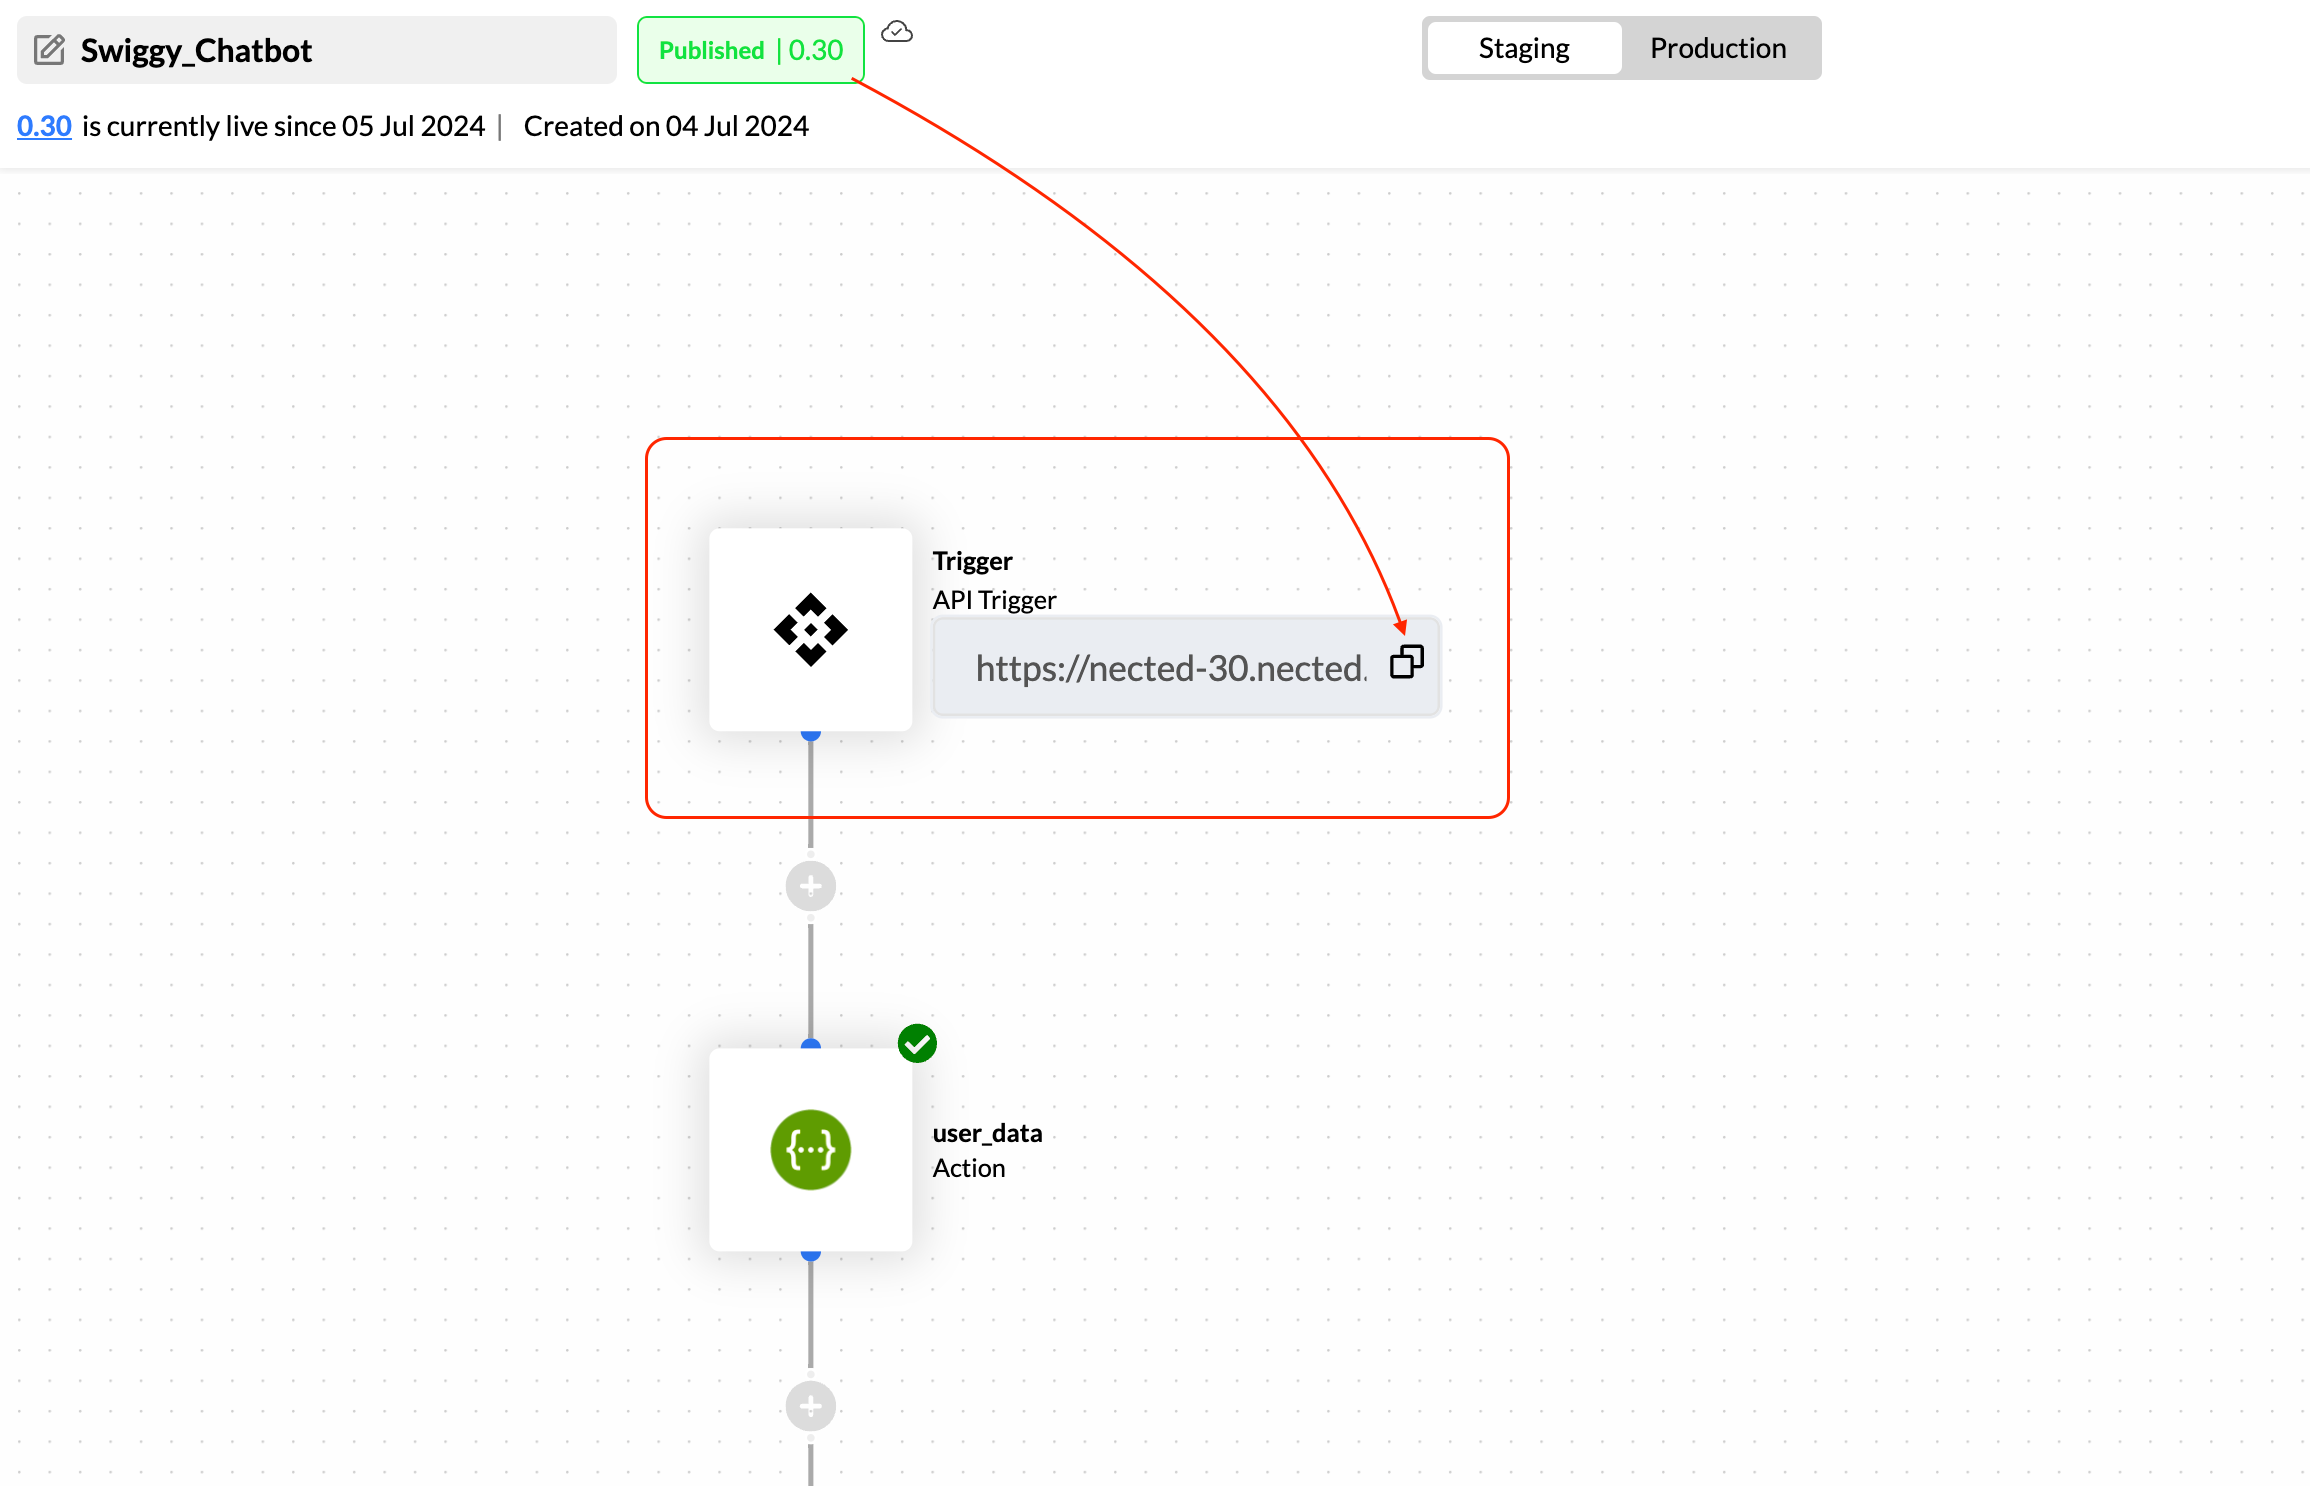
- Obtain the Workflow API URL: In the workflow editor find the "Trigger" node and copy the provided API URL.
- Prepare the API Request: Construct an HTTP POST request to the Workflow API URL. You can use JavaScript's built-in
fetch()function or a library like Axios to make the API call.
// Example using fetch()
fetch('', {
  method: 'POST',
  headers: {
    'Content-Type': 'application/json'
  },
  body: JSON.stringify({
    // Include any necessary parameters or data
    // that the workflow expects as input
  })
})
.then(response => response.json())
.then(data => {
  console.log('Workflow triggered successfully:', data);
})
.catch(error => {
  console.error('Error triggering workflow:', error);
});
- Replace
'<https://nected-XX.nected.io/nected/workflow/6686a36XXXXXXXXXX>'with the actual API URL obtained from the Nected dashboard. - Handle the Workflow Response: The workflow's response will be returned in the API call's success callback. You can then process the data and update your application's user interface accordingly.
Step 2: Integrate the Workflow API within the JavaScript Code
Now that you can trigger the Nected workflow via the API, you need to integrate this functionality within your application's JavaScript code. This will allow you to seamlessly connect the chatbot's conversational flow with your user interface.
- Identify Chatbot Trigger Points: Determine the specific user interactions or events within your application that should trigger the chatbot's conversational flow. These could be button clicks, form submissions, or other user-initiated actions.
- Implement Chatbot Trigger Functionality: In the relevant parts of your JavaScript code, add event listeners or other mechanisms to detect the identified trigger points. When a trigger is detected, call the Workflow API using the code snippet from the previous step
- Customize the Chatbot Integration: Depending on your application's specific requirements, you may need to handle additional logic, such as managing user input, maintaining conversation state, or integrating the chatbot's responses with your application's design and functionality.
// Example: Triggering the chatbot on a button click
const chatbotButton = document.getElementById('chatbot-button');
chatbotButton.addEventListener('click', () => {
  triggerChatbotWorkflow();
});

function triggerChatbotWorkflow() {
  // Call the Workflow API to initiate the chatbot's conversational flow
  fetch('', {
    // API request code from the previous step
  })
  .then(response => response.json())
  .then(data => {
    // Handle the workflow response and update the user interface
    updateChatbotUI(data);
  })
  .catch(error => {
    console.error('Error triggering chatbot workflow:', error);
  });
}

function updateChatbotUI(data) {
  // Update the chatbot's user interface based on the workflow response
  // This could involve displaying the chatbot's responses, updating
  // interactive elements, or triggering further actions
  console.log('Chatbot UI updated:', data);
}
By following these steps, you will be able to seamlessly integrate the Swiggy-like chatbot functionality, powered by Nected's workflow API, into your application. This will enable your users to engage with a sophisticated and responsive conversational assistant that replicates the success of Swiggy's renowned chatbot.
Test the chatbot
Before deploying your Swiggy-like chatbot to production, it's crucial to thoroughly test its functionality and optimize its performance. This section will guide you through the process of testing the chatbot and identifying areas for improvement.
Step 1: Define Test Scenarios
Create a comprehensive list of test scenarios that cover various aspects of the chatbot's functionality. These scenarios should include:
- Common user queries and intents
- Edge cases and unexpected inputs
- Handling of user errors or invalid inputs
- Seamless transitions between conversational flows
Step 2: Conduct Unit Tests
Perform unit tests on individual components of the chatbot, such as the Switch Block conditions, Response Node content, and external data integrations. Ensure that each component functions correctly and provides the expected responses.
- Test Switch Block Conditions: Verify that the Switch Block correctly identifies and routes user inputs to the appropriate conversational paths.
- Validate Response Node Content: Ensure that the chatbot's responses are accurate, relevant, and aligned with the user's intent.
- Test External Data Integrations: Confirm that the chatbot can successfully fetch and incorporate data from external systems (e.g., order management, product catalog) into its responses.
Step 3: Conduct End-to-End Tests
Perform end-to-end tests that simulate complete user journeys, from initiating the chatbot to resolving the user's query. This will help identify any gaps or inconsistencies in the overall conversational flow.
- Test Common User Journeys: Simulate typical user scenarios and verify that the chatbot can guide the user through the entire conversation, providing relevant and helpful responses at each step.
- Test Edge Cases: Introduce unexpected inputs or scenarios to ensure that the chatbot can handle them gracefully and provide appropriate responses or fallback options.
Step 4: Gather User Feedback
Collect feedback from a sample group of users who interact with the chatbot during testing. This feedback will help you identify areas for improvement and ensure that the chatbot meets user expectations.
- Conduct User Surveys: Gather user feedback through surveys that assess the chatbot's ease of use, responsiveness, and overall satisfaction.
- Analyze User Interactions: Monitor and analyze user interactions with the chatbot to identify common pain points, frequently asked questions, or areas where the chatbot's responses could be improved.
Step 5: Optimize the Chatbot
Based on the test results and user feedback, optimize the chatbot's performance and user experience.
- Refine Switch Block Conditions: Adjust the Switch Block conditions to improve the accuracy of user intent detection and ensure smooth transitions between conversational paths.
- Enhance Response Node Content: Update the Response Node content to provide clearer, more concise, and more helpful responses to users.
- Improve External Data Integration: Optimize the integration with external systems to enhance the chatbot's ability to fetch and display relevant data in a timely manner.
Step 6: Iterate and Monitor
Continuously monitor the chatbot's performance after deployment and gather ongoing user feedback. Implement iterative improvements based on this feedback to ensure that the chatbot remains effective and engaging over time.By following these steps and leveraging Nected's testing capabilities, you can ensure that your Swiggy-like chatbot is thoroughly tested, optimized, and ready to provide an exceptional conversational experience to your customers.
Conclusion
So, in this guide, we have explored the process of creating a Swiggy-like chatbot using Nected. From setting up your Nected account and creating a new workflow to defining the chatbot's conversational flow and integrating the API within the code, we have covered all the essential steps.By following these steps, you can create a sophisticated and engaging chatbot that replicates the success of Swiggy's renowned conversational assistant. Remember to thoroughly test and optimize your chatbot to ensure it meets user expectations and provides an exceptional conversational experience.For further details and to dive deeper into the technical aspects, refer to the provided code file and the Nected documentation.


.svg.webp)
.webp)


.webp)


.webp)


%20(1).webp)